Development Guide
Tips
This page mainly describes the PR workflow and MAA's file formatting requirements. If you want to learn specifically how to make changes to MAA's operational logic, please refer to the Protocol Documentation
Tips
You can Ask DeepWiki to learn about the overall architecture of the MAA project.
I don't know programming but just want to modify some JSON files/documents, how can I do it?
Welcome to the Web-based PR Tutorial that anyone can understand (purely web-based on GitHub.com)
I want to make simple modifications to a few lines of code, but configuring the environment is too tedious and pure web editing is difficult to use. What should I do?
Use the GitHub Codespaces online development environment and try it out!
We've preset several different development environments for you to choose from:
Blank environment with a bare Linux container (default)

Lightweight environment, suitable for documentation site frontend development
Full environment, suitable for MAA Core related development (not recommended, suggest local development with full environment setup. See next section)
Complete Environment Setup (Windows)
If you forked the repository long ago, first delete it via your repository's
Settingsat the bottom.Visit the MAA main repository, click
Fork, thenCreate fork.Clone the dev branch of your repository with submodules:
git clone --recurse-submodules <your repository link> -b dev-v2 --single-branchTips
--single-branchonly fetches the history fordev-v2. If you later want to switch to another branch, rungit remote set-branches origin '*'and fetch again so Git can download the missing branch data, or re-clone the repository without--single-branch.Warning
If using Git GUI clients like Visual Studio without
--recurse-submodulessupport, rungit submodule update --initafter cloning to initialize submodules.Download prebuilt third-party libraries
Python environment required - search for Python installation tutorials if needed
(tools/maadeps-download.py is located in the project root)python tools/maadeps-download.pyConfigure development environment
- Download and install
CMake - Download and install
Visual Studio 2026 Community, selectingDesktop development with C++and.NET Desktop Developmentduring installation.
- Download and install
Execute cmake project configuration
cmake --preset windows-x64Double-click
build/MAA.slnxto open the project in Visual Studio.Configure Visual Studio settings
- Select
Debugandx64in the top configuration bar - Right-click
MaaWpfGui- Set as Startup Project - Press F5 to run
Tips
To run Win32Controller (Windows window control) / MaaFwAdbController (MaaFramework touch mode) features, you need to manually download the package for your platform from MaaFramework Releases, and place
MaaWin32ControlUnit.dll/MaaAdbControlUnit.dllfrom thebindirectory into MAA's DLL directory (e.g.build/bin/Debug). PRs for an auto-download script are welcome!To debug these features, compile the Debug version of MaaFramework yourself and use the corresponding DLLs, or it will randomly crash at breakpoints.
- Select
Now you're ready to happily
mess aroundstart developing!Commit regularly with meaningful messages during development
If you're not familiar with git usage, you might want to create a new branch for changes instead of committing directly todev-v2:git branch your_own_branch git checkout your_own_branchThis keeps your changes isolated from upstream
dev-v2updates.After development, push your local branch (e.g.
dev-v2) to your remote repository:git push origin dev-v2Submit a Pull Request at the MAA main repository. Ensure your changes are based on the
dev-v2branch, notmaster.To sync upstream changes:
Add upstream repository:
git remote add upstream https://github.com/MaaAssistantArknights/MaaAssistantArknights.gitFetch updates:
git fetch upstreamRebase (recommended) or merge:
git rebase upstream/dev-v2 # rebaseor
git merge # mergeRepeat steps 8, 9, 10, 11.
Tips
After opening Visual Studio, Git operations can be performed using VS's built-in "Git Changes" instead of command-line tools.
Using VS Code for Development (Optional)
Warning
Visual Studio is the recommended IDE for development. The MAA project is primarily built around Visual Studio, and the complete environment setup described above covers all development needs with the best out-of-the-box experience. The VS Code workflow is provided only as an alternative for developers already familiar with VS Code + CMake + clangd, and requires more configuration effort.
If you prefer VS Code, you can use CMake, clangd, and related extensions for code completion, navigation, and debugging. After completing steps 1–6 above (clone, dependencies, CMake configuration), follow these steps:
Recommended Extensions
Install from the VS Code marketplace:
| Extension | Purpose |
|---|---|
| CMake Tools | CMake configure, build, and debug integration |
| clangd | C++ IntelliSense, code navigation, diagnostics (LSP-based) |
| C/C++ | Debug C++ programs (works with CMake Tools or launch.json) |
Tips
When using clangd, set C_Cpp.intelliSenseEngine to disabled to avoid conflicts with the C/C++ extension's IntelliSense.
Setup Steps
Open the project root folder in VS Code
CMake Tools:
- Select a Configure Preset from the status bar (e.g.
windows-x64,linux-x64) - Select a Build Preset and run configure/build
- Select a Configure Preset from the status bar (e.g.
clangd: On Linux/macOS, presets enable
CMAKE_EXPORT_COMPILE_COMMANDSand clangd usesbuild/compile_commands.jsonautomatically. On Windows, clangd's code completion and navigation requires generatingcompile_commands.jsonfirst:clangd Setup on Windows
- In VS Installer, check C++ Clang compiler for Windows (clang-cl)
- Switch to the
windows-x64-clangpreset and run Configure once to generatecompile_commands.jsoninbuild/, then clangd will work - This preset uses clang-cl instead of MSVC and cannot produce valid build artifacts; switch back to
windows-x64for actual builds - clangd analyzes based on clang-cl; some code (e.g. MSVC-specific extensions) may show errors. These can be ignored and do not affect MSVC compilation
Command-line preset switching example (run from project root):
rem Generate compile_commands.json (Configure only, no build) cmake --preset windows-x64-clang rem Switch back to MSVC for actual build cmake --preset windows-x64 cmake --build --preset windows-x64-RelWithDebInfoDebugging: The project includes
.vscode/launch.jsonfor launching MaaWpfGui or Debug Demo
Build and Debug Shortcuts
- Build:
Ctrl+Shift+Bor via CMake Tools status bar - Debug: F5 or choose a configuration from the Run and Debug panel
MAA File Formatting Requirements
MAA uses a series of formatting tools to ensure that the code and resource files in the repository are visually unified for easy maintenance and reading.
Please ensure that it has been formatted before submission, or enable Pre-commit Hooks for automatic formatting.
The currently enabled formatting tools are as follows:
| File Type | Format Tool |
|---|---|
| C++ | clang-format |
| JSON/YAML | Prettier |
| Markdown | markdownlint |
Use Pre-commit Hooks to Automatically Format Code
Ensure that you have Python and Node environments on your computer.
Execute the following command in the root directory of the project:
pip install pre-commit
pre-commit install
If pre-commit still cannot be used after pip install, please check if the pip installation path has been added to the PATH.
The formatting tool will automatically run every time you submit to ensure that your code format conforms to the style guide.
Enable clang-format in Visual Studio
Install clang-format version 20.1.0 or higher.
python -m pip install clang-formatUse tools like 'Everything' to locate the installation location of clang-format.exe. As a reference, if you are using Anaconda, clang-format.exe will be installed in YourAnacondaPath/Scripts/clang-format.exe.
In Visual Studio, search for 'clang-format' in Tools-Options.
Click
Enable ClangFormat supportand selectUse custom clang-format.exe fileand choose theclang-format.exelocated in Step 2.
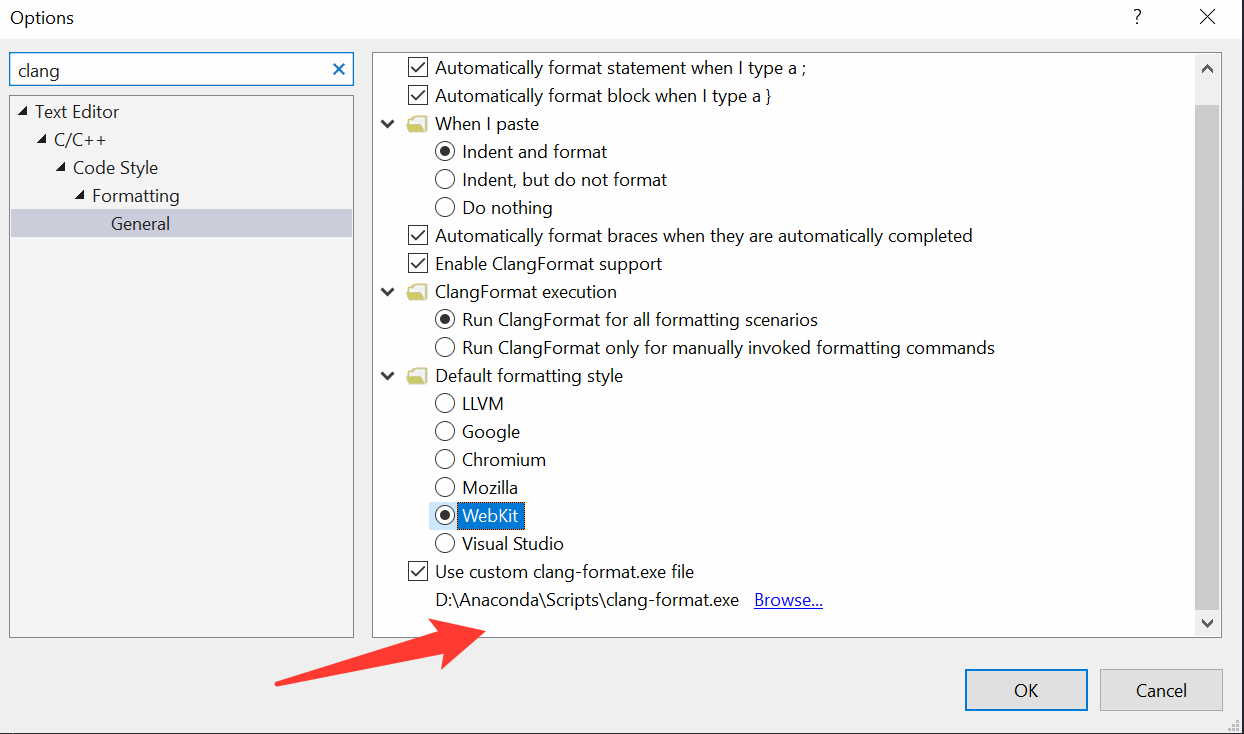
You are all set with the clang-format integrated in Visual Studio supporting c++20 features!
You can also format with tools\ClangFormatter\clang-formatter.py directly, by executing in the root folder of the project:
python tools\ClangFormatter\clang-formatter.py --clang-format=PATH\TO\YOUR\clang-format.exe --input=src\MaaCore