This is a very special container
Document Writing Guide
Tips
The purpose of this document is to guide document writers to better utilize the functionalities provided by the theme, thus achieving a more readable effect.
Our documentation is built on vuepress and utilizes the vuepress-theme-plume theme. You can also refer to the official documentation for more detailed explanations. Here, we only introduce some common functionalities.
Deploy Locally
- Install Pnpm, and clone the repository refer to Introduction to GitHub Pull request Flow.
- Create a terminal in the
docsdirectory, then runpnpm ito download dependencies. - Run
pnpm run devto deploy.
Containers
Not the docker container
This theme provides support for custom containers such as tips, notes, info, warnings, alerts, and details. We can utilize this feature to emphasize certain content.
Note that if containers are nested within containers, the parent container should use one more colon : than the child container to differentiate them.
Usage of containers:
::: [Container Type] [Container Title (optional)]
Content you want to write
:::
Or use GitHub-style syntax:
> [!Container Type]
> Content you want to write
Accepted container types and their default titles are as follows:
tipTipsnoteNoteinfoInfowarningWarningdangerCautiondetailsDetailswindowSpecial Container
Container Examples
Tips
This is a tip container
Note
This is a note container
Info
This is an info container
Warning
This is a warning container
Caution
This is a danger container
Details
This is a details container
Markers
You can use the marker syntax to highlight content and emphasize key points.
Usage: Use ==content=={color (optional)} syntax to mark text. Note that spaces are required on both sides of the marks.
Input:
MaaAssistantArknights is developed by ==many pigs==Output:
MaaAssistantArknights is developed by many pigs
The theme also has the following built-in color schemes:
- default:
==Default==- Default - info:
==Info=={.info}- Info - note:
==Note=={.note}- Note - tip:
==Tip=={.tip}- Tip - warning:
==Warning=={.warning}- Warning - danger:
==Danger=={.danger}- Danger - caution:
==Caution=={.caution}- Caution - important:
==Important=={.important}- Important
Hidden Text
For some reason, you may need to temporarily black out a section of the document. In this case, you can use the hidden text feature.
You can use the !!content!!{config (optional)} syntax, and the default effect is as follows:
I always feel like I'm reading MoeGirl (strikethrough
The following configurations are available:
Input:
+ Mask effect + Mouse hover: !!Mouse hover to see me!!{.mask .hover}
+ Mask effect + Click: !!Click to see me!!{.mask .click}
+ Text blur effect + Mouse hover: !!Mouse hover to see me!!{.blur .hover}
+ Text blur effect + Click: !!Click to see me!!{.blur .click}
Output:
- Mask effect + Mouse hover: Mouse hover to see me
- Mask effect + Click: Click to see me
- Text blur effect + Mouse hover: Mouse hover to see me
- Text blur effect + Click: Click to see me
Steps
When writing a step-by-step tutorial, ordered lists may lose their hierarchy due to nesting. In this case, the steps container is the best choice.
Input:
:::: steps
1. Step 1

   ```ts
   console.log('Hello World!')
   ```

2. Step 2

   Here is the content related to Step 2

3. Step 3

   ::: tip
   Tip container
   :::

4. End
::::
Output:
Step 1
console.log('Hello World!')Step 2
Here is the content related to Step 2
Step 3
Tips
Tip container
End
Smart Image Container
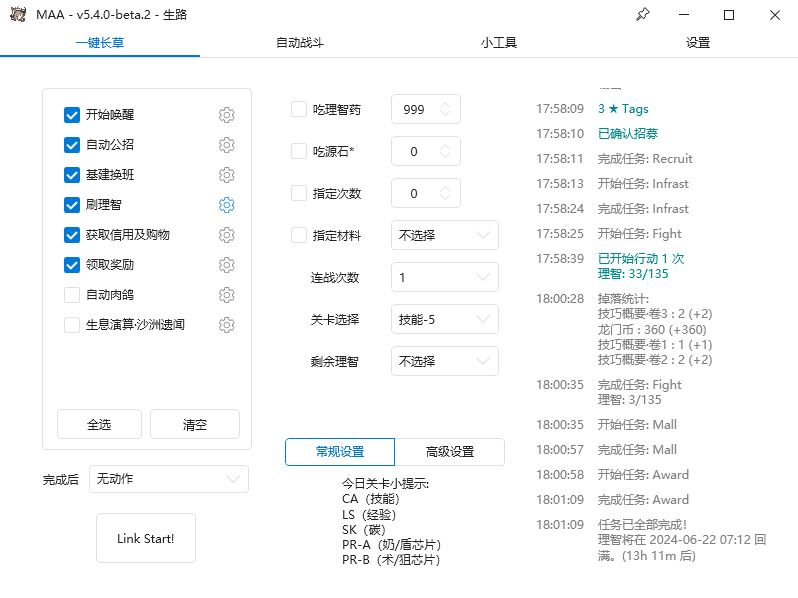
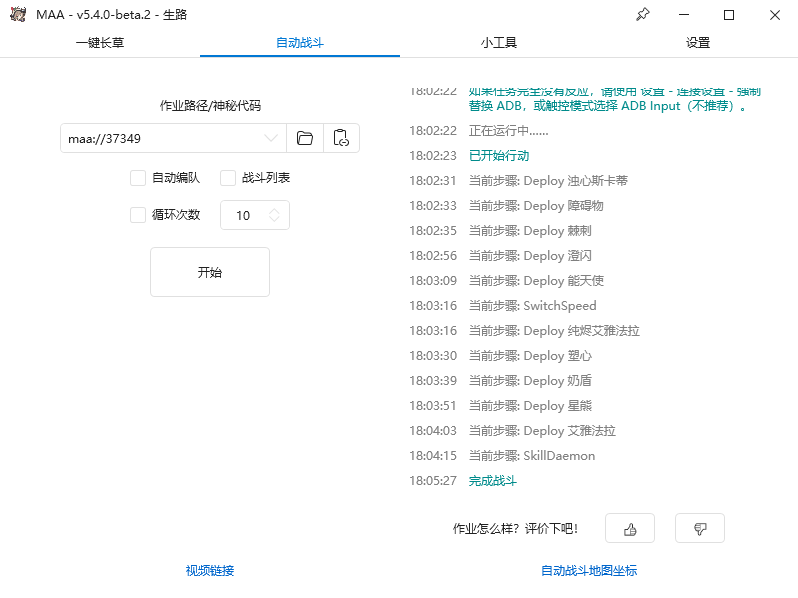
We have wrapped an image container based on the functionality provided by the theme. This container can automatically display the corresponding image in light and dark themes, while supporting automatic layout.
You can use the <ImageGrid> component in the markdown body to invoke this method. The specific syntax and effects are as follows:
This is the syntax:
<ImageGrid :imageList="[
  {
    light: 'images/zh-cn/readme/1-light.png',
    dark: 'images/zh-cn/readme/1-dark.png'
  },
  {
    light: 'images/zh-cn/readme/2-light.png',
    dark: 'images/zh-cn/readme/2-dark.png'
  },
  {
    light: 'images/zh-cn/readme/3-light.png',
    dark: 'images/zh-cn/readme/3-dark.png'
  },
  {
    light: 'images/zh-cn/readme/4-light.png',
    dark: 'images/zh-cn/readme/4-dark.png'
  }
]" />
This is the rendered result:
Field Container
This syntax is more complex. Please refer to the official documentation for usage.
The effects are as follows:
{ base: '/' }
Theme configuration
true
Whether to enable
() => {}
Added in v1.0.0
Callback function
Deprecated in v0.9.0
Deprecated property
Icons
This theme provides icon support, where you can use icons in the following places:
Document title: Set the icon next to the document title in frontmatter.
Navbar/Sidebar: Set icons displayed in the navbar and sidebar.
Document content: Use icons in the document content.
Setting Document Icons
You can use icon in the document's frontmatter to set the document's icon.
This icon will be displayed next to the document title.
Frontmatter settings of this document
---
icon: jam:write-f
---
Using Icons in Documents
You can use the <HopeIcon /> component to add icons in markdown. This component has the following attributes:
icon: Accepts icon keywords and URLs, such asjam:write-f,ic:round-home, etc.color: Accepts CSS-style color values, such as#fff,red, etc. (This option only works for SVG icons).size: Accepts CSS-style sizes, such as1rem,2em,100px, etc.
Example
<HopeIcon icon="ic:round-home" color="#1f1e33"/><HopeIcon icon="/images/maa-logo_512x512.png" size="4rem" />Obtaining Icon Keywords
The icons used in this document are from iconify. You can search for the icons you want in its provided icon search interface and then copy their keywords.
Frontmatter
Frontmatter is the content at the beginning of a Markdown document enclosed in ---, using YAML syntax internally. Through frontmatter, we can identify the document's editing time, the icon used, the classification, tags, etc.
Example
---
date: 1919-08-10
icon: jam:write-f
order: 1
---

# Document Title

...
The meanings of each field are as follows:
date: Editing time of the documenticon: Icon next to the document titleorder: Document order in the sidebar